Karpenter Kubernetes Node Autoscaling
K8S Autoscaling helps us to scale out or in our applications. Pod-based scaling or HPA is an excellent first step. However, the problem is when we need more K8S nodes to contain our PODs. Karpenter is a Node-based scaling solution built for K8S, and its goal is to improve efficiency and cost. It is a great solution because we don't need to configure instances types or create nodegroups, which drastically simplifies configuration. On the other hand, the integration with Spot instances is painless and we can reduce our costs (up to 90% cheaper than On-Demand instances)
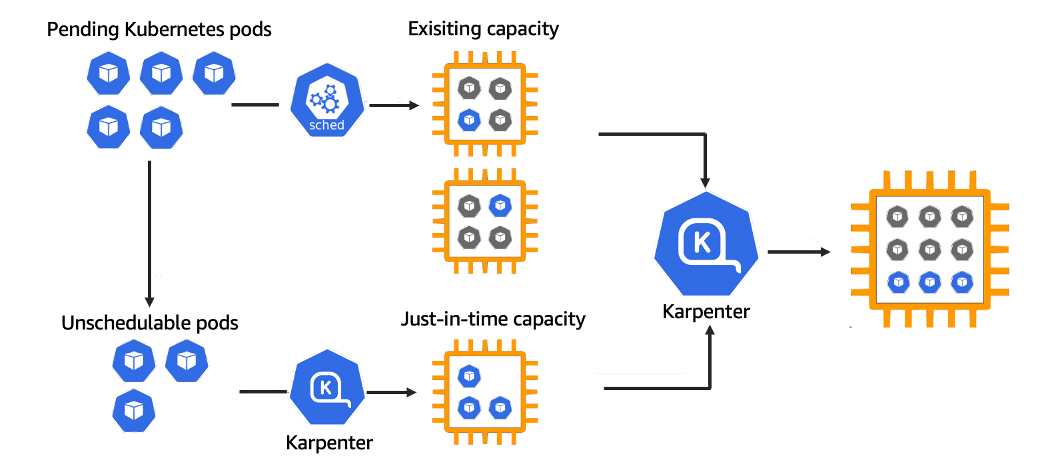
A Kubernetes node autoscaling solution is a tool that automatically adjusts the size of the Kubernetes cluster based on the demands of our workloads. Because of this, we don’t need to create manually a new Kubernetes Node every time we need it (or delete it). Karpenter automatically provisions new nodes in response to unschedulable pods. It does this by observing events within the Kubernetes cluster, and then sending commands to the underlying cloud provider. It is designed to work with any Kubernetes cluster in any environment.
Karpenter works by:
- Watching for pods that the Kubernetes scheduler has marked as unschedulable
- Evaluating scheduling constraints (resource requests, nodeselectors, affinities, tolerations, and topology spread constraints) requested by the pods
- Provisioning nodes that meet the requirements of the pods
- Scheduling the pods to run on the new nodes
- Removing the nodes when the nodes are no longer needed
In this tutorial, you learn how to:
- Creating EKS Cluster for Karpenter
- Configuring AWS Roles
- Installing Karpenter
- Configuring Karpenter Provisioner
- Testing Karpenter Node Autoscaling
Requirements
- AWS CLI
- eksctl
- kubectl
- helm
Why choose Karpenter instead ClusterAutoscaler
- We don’t need to create node groups
- We don’t need to choose the right instance size
- Faster to bound pods to the new nodes than ClusterAutoscaler
If you want to learn more about this topic, Justin Garrison made a great video about it
Creating EKS Cluster for Karpenter
Before continuing we need to configure some environment variables
> export CLUSTER_NAME=YOUR-CLUSTER-NAME
> export AWS_ACCOUNT_ID=YOUR-ACCOUNT-ID
Creating a cluster with eksctl is the easiest way to do it on AWS. First we need to create a yaml file. For example test-sandbox.yaml
> cat <<EOF > test-sandbox.yaml
---
apiVersion: eksctl.io/v1alpha5
kind: ClusterConfig

metadata:
  name: ${CLUSTER_NAME}
  region: us-east-1
  version: "1.21"
  tags:
    karpenter.sh/discovery: ${CLUSTER_NAME}

managedNodeGroups:
  - instanceType: t3.medium
    amiFamily: AmazonLinux2
    name: ${CLUSTER_NAME}-ng
    desiredCapacity: 1
    minSize: 1
    maxSize: 3
iam:
  withOIDC: true
EOF
Note: We sets up an IAM OIDC provider for the cluster to enable IAM roles for pods.
Create the cluster using the generated file
> eksctl create cluster -f test-sandbox.yaml
Note: We will use a managed node group to host Karpenter. Karpenter itself can run anywhere, including on self-managed node groups, managed node groups, or AWS Fargate. Karpenter will provision EC2 instances in our account.
Configuring AWS Roles
To use Karpenter on AWS we need to configure 3 permissions:
- KarpenterNode IAM Role: InstanceProfile with permissions to run containers and configure networking
- KarpenterController IAM Role: Permission to launch instances
- EC2 Spot Service Linked Role: To run EC2 Spot in our Account Note: EC2 Spot Instance is an unused EC2 instance that is available for less than the On-Demand price
Creating the KarpenterNode IAM Role First we need to create the IAM resources using AWS CloudFormation. We need to download the cloudformation stack from the karpenter site, and deploy it with our cluster name information
> curl -fsSL https://karpenter.sh/v0.5.5/getting-started/cloudformation.yaml  > cloudformation.tmp
> aws cloudformation deploy \
  --stack-name ${CLUSTER_NAME}  \
  --template-file cloudformation.tmp \
  --capabilities CAPABILITY_NAMED_IAM \
  --parameter-overrides ClusterName=${CLUSTER_NAME}
Waiting for changeset to be created..
Waiting for stack create/update to complete
Successfully created/updated stack - Karpenter-test-sandbox
Second, we need to grant access to instances using the profile to connect to the cluster. This command adds the Karpenter node role to your aws-auth configmap, allowing nodes with this role to connect to the cluster.
> eksctl create iamidentitymapping \
  --username system:node:{{EC2PrivateDNSName}} \
  --cluster ${CLUSTER_NAME} \
  --arn arn:aws:iam::${AWS_ACCOUNT_ID}:role/KarpenterNodeRole-${CLUSTER_NAME} \
  --group system:bootstrappers \
  --group system:nodes
2022-01-24 11:26:18 [ℹ]  eksctl version 0.79.0
2022-01-24 11:26:18 [ℹ]  using region us-east-1
2022-01-24 11:26:18 [ℹ]  adding identity "arn:aws:iam::123456789:role/KarpenterNodeRole-test-sandbox" to auth ConfigMap
Now, Karpenter can launch new EC2 instances and those instances can connect to your cluster.
Creating the KarpenterController IAM Role This will create an AWS IAM Role, Kubernetes service account, and associate them using IRSA
> eksctl create iamserviceaccount \
  --cluster $CLUSTER_NAME --name karpenter --namespace karpenter \
  --attach-policy-arn arn:aws:iam::$AWS_ACCOUNT_ID:policy/KarpenterControllerPolicy-$CLUSTER_NAME \
  --approve
2022-01-24 11:35:04 [ℹ]  eksctl version 0.79.0
2022-01-24 11:35:04 [ℹ]  using region us-east-1
2022-01-24 11:35:07 [ℹ]  1 iamserviceaccount (karpenter/karpenter) was included (based on the include/exclude rules)
2022-01-24 11:35:07 [!]  serviceaccounts that exist in Kubernetes will be excluded, use --override-existing-serviceaccounts to override
2022-01-24 11:35:07 [ℹ]  1 task: {
    2 sequential sub-tasks: {
        create IAM role for serviceaccount "karpenter/karpenter",
        create serviceaccount "karpenter/karpenter",
    } }2022-01-24 11:35:07 [ℹ]  building iamserviceaccount stack "eksctl-test-sandbox-addon-iamserviceaccount-karpenter-karpenter"
2022-01-24 11:35:07 [ℹ]  deploying stack "eksctl-dh-sandbox-addon-iamserviceaccount-karpenter-karpenter"
2022-01-24 11:35:07 [ℹ]  waiting for CloudFormation stack "eksctl-test-sandbox-addon-iamserviceaccount-karpenter-karpenter"
2022-01-24 11:35:24 [ℹ]  waiting for CloudFormation stack "eksctl-test-sandbox-addon-iamserviceaccount-karpenter-karpenter"
2022-01-24 11:35:42 [ℹ]  waiting for CloudFormation stack "eksctl-test-sandbox-addon-iamserviceaccount-karpenter-karpenter"
2022-01-24 11:35:43 [ℹ]  created namespace "karpenter"
2022-01-24 11:35:43 [ℹ]  created serviceaccount "karpenter/karpenter"
Creating the EC2 Spot Service Linked Role This step is only necessary if this is the first time you’re using EC2 Spot in this account.
> aws iam create-service-linked-role --aws-service-name spot.amazonaws.com
{
    "Role": {
        "Path": "/aws-service-role/spot.amazonaws.com/",
        "RoleName": "AWSServiceRoleForEC2Spot",
        "RoleId": "AROAWSZX3U6WNUM3KWB",
        "Arn": "arn:aws:iam::123456789:role/aws-service-role/spot.amazonaws.com/AWSServiceRoleForEC2Spot",
        "CreateDate": "2022-01-24T14:37:25+00:00",
        "AssumeRolePolicyDocument": {
            "Version": "2012-10-17",
            "Statement": [
                {
                    "Action": [
                        "sts:AssumeRole"
                    ],
                    "Effect": "Allow",
                    "Principal": {
                        "Service": [
                            "spot.amazonaws.com"
                        ]
                    }
                }
            ]
        }
    }
}
Installing Karpenter
We can use Helm to deploy Karpenter
> helm repo add karpenter https://charts.karpenter.sh
> helm repo update
> helm upgrade --install karpenter karpenter/karpenter --namespace karpenter \
  --create-namespace --set serviceAccount.create=false --version v0.5.5 \
  --set controller.clusterName=${CLUSTER_NAME} \
  --set controller.clusterEndpoint=$(aws eks describe-cluster --name ${CLUSTER_NAME} --query "cluster.endpoint" --output json) \
  --wait # for the defaulting webhook to install before creating a Provisioner
Release "karpenter" does not exist. Installing it now.
NAME: karpenter
LAST DEPLOYED: Mon Jan 24 11:43:06 2022
NAMESPACE: karpenter
STATUS: deployed
REVISION: 1
TEST SUITE: None
Check the Karpenter resources on K8S
> k get all -n karpenter
NAME                                        READY   STATUS    RESTARTS   AGE
pod/karpenter-controller-5b95dc6f89-t9tpx   1/1     Running   0          47s
pod/karpenter-webhook-988c5bb85-hpvbz       1/1     Running   0          47s

NAME                        TYPE        CLUSTER-IP       EXTERNAL-IP   PORT(S)    AGE
service/karpenter-metrics   ClusterIP   10.100.179.73    <none>        8080/TCP   49s
service/karpenter-webhook   ClusterIP   10.100.213.187   <none>        443/TCP    49s

NAME                                   READY   UP-TO-DATE   AVAILABLE   AGE
deployment.apps/karpenter-controller   1/1     1            1           50s
deployment.apps/karpenter-webhook      1/1     1            1           50s

NAME                                              DESIRED   CURRENT   READY   AGE
replicaset.apps/karpenter-controller-5b95dc6f89   1         1         1       51s
replicaset.apps/karpenter-webhook-988c5bb85       1         1         1       51s
Configuring Karpenter Provisioner
A Karpenter provisioned is to manage different provisioning decisions based on pod attributes such as labels and affinity.
cat <<EOF | kubectl apply -f -
apiVersion: karpenter.sh/v1alpha5
kind: Provisioner
metadata:
  name: default
spec:
  requirements:
    - key: karpenter.sh/capacity-type
      operator: In
      values: ["spot"]
  limits:
    resources:
      cpu: 1000
  provider:
    subnetSelector:
      karpenter.sh/discovery: ${CLUSTER_NAME}
    securityGroupSelector:
      karpenter.sh/discovery: ${CLUSTER_NAME}
    instanceProfile: KarpenterNodeInstanceProfile-${CLUSTER_NAME}
  ttlSecondsAfterEmpty: 30
EOF
Karpenter is ready to begin provisioning nodes.
Testing Karpenter Node Autoscaling
This deployment uses the pause image and starts with zero replicas.
cat <<EOF | kubectl apply -f -
apiVersion: apps/v1
kind: Deployment
metadata:
  name: inflate
spec:
  replicas: 0
  selector:
    matchLabels:
      app: inflate
  template:
    metadata:
      labels:
        app: inflate
    spec:
      terminationGracePeriodSeconds: 0
      containers:
        - name: inflate
          image: public.ecr.aws/eks-distro/kubernetes/pause:3.2
          resources:
            requests:
              cpu: 1
EOF
Now we can scale the deployment to 5 replicas
> k scale deployment inflate --replicas 5
The pods are in pending state
> k get pod
NAME                       READY   STATUS    RESTARTS   AGE
inflate-6b88c9fb68-27zwp   0/1     Pending   0          11s
inflate-6b88c9fb68-9d8ch   0/1     Pending   0          11s
inflate-6b88c9fb68-dv85n   0/1     Pending   0          11s
inflate-6b88c9fb68-gd2zg   0/1     Pending   0          11s
inflate-6b88c9fb68-q6x4v   0/1     Pending   0          11s
Because the node does not have enough CPU
> k describe pod inflate-6b88c9fb68-27zwp | tail -n 1
  Warning  FailedScheduling  44s (x2 over 45s)  default-scheduler  0/1 nodes are available: 1 Insufficient CPU.
Now we can check the Karpenter Logs
> k logs -f -n karpenter $(k get pods -n karpenter -l karpenter=controller -o name)
2022-01-24T21:21:50.984Z	INFO	controller.provisioning	Computed packing of 1 node(s) for 5 pod(s) with instance type option(s) [c1.xlarge c4.2xlarge c6i.2xlarge c5d.2xlarge c5.2xlarge c5ad.2xlarge c5a.2xlarge c5n.2xlarge m6a.2xlarge m5ad.2xlarge m5a.2xlarge m4.2xlarge m5zn.2xlarge m5dn.2xlarge m5d.2xlarge m6i.2xlarge t3.2xlarge m5.2xlarge m5n.2xlarge t3a.2xlarge]	{"commit": "723b1b7", "provisioner": "default"}
2022-01-24T21:21:54.002Z	INFO	controller.provisioning	Launched instance: i-0e04feb041c553894, hostname: ip-192-168-51-235.ec2.internal, type: t3a.2xlarge, zone: us-east-1f, capacityType: spot	{"commit": "723b1b7", "provisioner": "default"}
2022-01-24T21:21:54.051Z	INFO	controller.provisioning	Bound 5 pod(s) to node ip-192-168-51-235.ec2.internal	{"commit": "723b1b7", "provisioner": "default"}
2022-01-24T21:21:54.051Z	INFO	controller.provisioning	Waiting for unschedulable pods	{"commit": "723b1b7", "provisioner": "default"}
Karpenter created a new Instance:
- instance: i-0e04feb041c553894,
- hostname: ip-192-168-51-235.ec2.internal,
- type: t3a.2xlarge,
- zone: us-east-1f,
The pods now are running
> k get pod
NAME                       READY   STATUS    RESTARTS   AGE
inflate-6b88c9fb68-27zwp   1/1     Running   0          3m52s
inflate-6b88c9fb68-9d8ch   1/1     Running   0          3m52s
inflate-6b88c9fb68-dv85n   1/1     Running   0          3m52s
inflate-6b88c9fb68-gd2zg   1/1     Running   0          3m52s
inflate-6b88c9fb68-q6x4v   1/1     Running   0          3m52s
We can check the nodes,
> k get nodes
NAME                             STATUS   ROLES    AGE     VERSION
ip-192-168-51-235.ec2.internal   Ready    <none>   4m18s   v1.21.5-eks-9017834
ip-192-168-55-62.ec2.internal    Ready    <none>   4h10m   v1.21.5-eks-9017834
Now we have a new working node. The node is an EC2 Spot instance. We can view the SpotPrice
> aws ec2 describe-spot-instance-requests | grep "InstanceType\|InstanceId\|SpotPrice"
            "InstanceId": "i-0e04feb041c553894",
                "InstanceType": "t3a.2xlarge",
            "SpotPrice": "0.300800",
Finally, we can scale the deployment to 0 again to check if the node will be removed
> k scale deployment inflate --replicas 0
deployment.apps/inflate scaled
Karpenter cordoned (taint and clean) the node and after that deleted it
> k logs -f -n karpenter $(k get pods -n karpenter -l karpenter=controller -o name)
2022-01-24T21:28:51.437Z	INFO	controller.node	Added TTL to empty node	{"commit": "723b1b7", "node": "ip-192-168-51-235.ec2.internal"}
2022-01-24T21:29:21.463Z	INFO	controller.node	Triggering termination after 30s for empty node	{"commit": "723b1b7", "node": "ip-192-168-51-235.ec2.internal"}
2022-01-24T21:29:21.497Z	INFO	controller.termination	Cordoned node	{"commit": "723b1b7", "node": "ip-192-168-51-235.ec2.internal"}
2022-01-24T21:29:21.669Z	INFO	controller.termination	Deleted node	{"commit": "723b1b7", "node": "ip-192-168-51-235.ec2.internal"}
Check again the nodes. The second node was deleted
> k get nodes
NAME                            STATUS   ROLES    AGE     VERSION
ip-192-168-55-62.ec2.internal   Ready    <none>   4h16m   v1.21.5-eks-9017834
Cleanup
> helm uninstall karpenter --namespace karpenter
> eksctl delete iamserviceaccount --cluster ${CLUSTER_NAME} --name karpenter --namespace karpenter
> aws cloudformation delete-stack --stack-name Karpenter-${CLUSTER_NAME}
> aws ec2 describe-launch-templates \
    | jq -r ".LaunchTemplates[].LaunchTemplateName" \
    | grep -i Karpenter-${CLUSTER_NAME} \
    | xargs -I{} aws ec2 delete-launch-template --launch-template-name {}
> eksctl delete cluster --name ${CLUSTER_NAME}
Conclusion
Karpenter is a great tool to configure Kubernetes Nodes Autoscaling, it’s pretty new. However, it has integration with Spot instances, Fargate (serverless), and other cool features. The best part is we don’t need to configure nodegroups or choose the size of the instances, also it is very fast, it takes approximately 1 minute to deploy pods on the new node.
References
- https://karpenter.sh/v0.5.5/getting-started/
- https://www.replex.io/blog/kubernetes-in-production-best-practices-for-cluster-autoscaler-hpa-and-vpa
- https://aws.amazon.com/blogs/aws/introducing-karpenter-an-open-source-high-performance-kubernetes-cluster-autoscaler/
- https://blog.sivamuthukumar.com/karpenter-scaling-nodes-seamlessly-in-aws-eks
- https://towardsdev.com/karpenter-vs-cluster-autoscaler-dd877b91629b
- https://www.infoq.com/news/2022/01/karpenter-kubernetes-autoscaler/