Ingress Controller and External DNS with Route53 on EKS
One great way to expose Kubernetes Applications to the world is using Ingress resources. On EKS we can avoid creating one Load Balancer each time we expose an Application. Moreover, K8S Ingress offers a single entry point to the cluster. So we can save money, manage and monitor one Load Balancer and reduce the attack surface of the Cluster. This is great, however, every time we need to expose an application we will need to create and manage DNS records manually. We can set externalDNS by adding a simple annotation to our ingress resources pointing to the DNS record and then it will be created automatically on Route53. In conclusion, using Ingress resources and ExternalDNS allows us to save time, money and improve security.
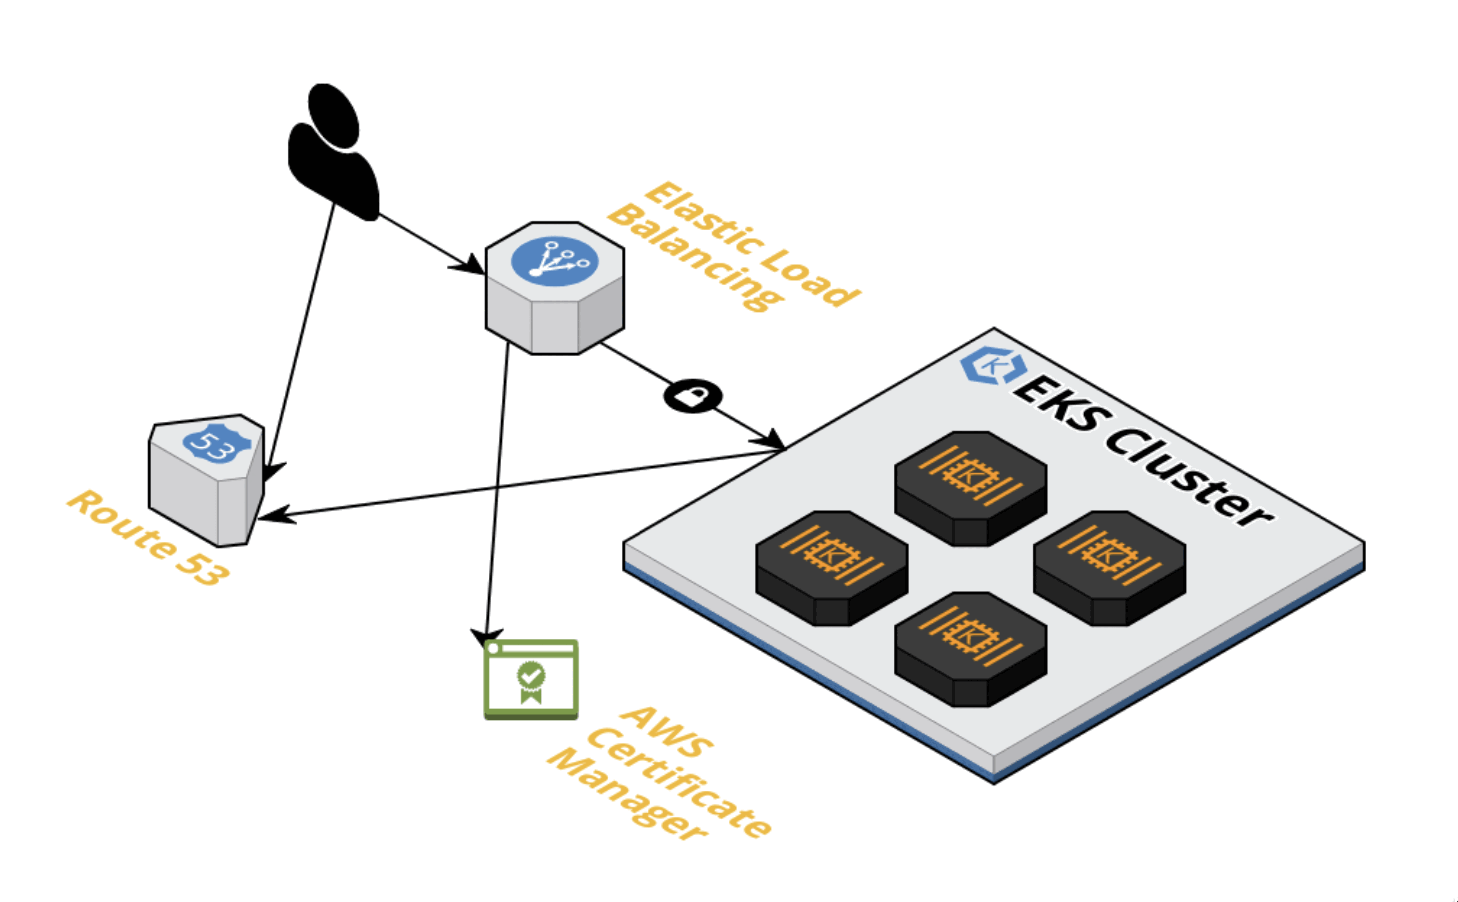
Normally when we expose an application on EKS we use a LoadBalancer service to expose the application, the problem with this is every time we create a new LoadBalancer service, AWS will create a new ELB. Ingress controllers on EKS allow us to use one ELB and configure the application access using Kubernetes resources.
By default an ingress controller doesn’t come with EKS, we need to install it. We’ll use nginx-ingress ingress controller to do that.
The NGINX Ingress Controller can be more efficient and cost-effective than a load balancer. Furthermore, features like path-based routing can be added with the NGINX ingress controller.
On the other hand, we can configure the Ingress controller as the only access to our Kubernetes Applications
With the Ingress controller we have the power to expose our applications to the world, however, creating each time every DNS record it’s annoying. To improve that we can use an external DNS to manage the DNS records of our ingresses automatically.
ExternalDNS synchronizes exposed Kubernetes Services and Ingresses with DNS providers. In a broader sense, ExternalDNS allows you to control DNS records dynamically via Kubernetes resources in a DNS provider-agnostic way.
In this tutorial, you learn how to:
- Installing Nginx Ingress controller
- Setting Domain and TLS certificate
- Configuring the external DNS
- Testing DNS creation on Route53
- Debugging External DNS and Route53
- Testing Ingress resource and External DNS
Requirements
- EKS Cluster
- EKSCTL
- Kubectl
- AWS CLI
- Helm
Installing Nginx ingress controller
We will use Helm to install the ingress controller, first, we need to add the helm repository.
> helm repo add ingress-nginx https://kubernetes.github.io/ingress-nginx
"ingress-nginx" has been added to your repositories
Creating the nginx-ingress namespace and Installing the ingress-nginx Helm chart
> kubectl create ns nginx-ingress
> helm install nginx-ingress ingress-nginx/ingress-nginx -n nginx-ingress
NAME: nginx-ingress
LAST DEPLOYED: Sun Jan  9 19:02:26 2022
NAMESPACE: nginx-ingress
STATUS: deployed
REVISION: 1
TEST SUITE: None
NOTES:
The ingress-nginx controller has been installed.
It may take a few minutes for the LoadBalancer IP to be available.
You can watch the status by running 'kubectl --namespace nginx-ingress get services -o wide -w nginx-ingress-ingress-nginx-controller'
Now we can check it, it takes one or two minutes to take effect.
> kubectl --namespace nginx-ingress get services -o wide -w nginx-ingress-ingress-nginx-controller
NAME                                     TYPE           CLUSTER-IP      EXTERNAL-IP                                                              PORT(S)                      AGE    SELECTOR
nginx-ingress-ingress-nginx-controller   LoadBalancer   10.100.37.117   ad529a84ea5d948319b7b435ed852804-951521075.us-east-1.elb.amazonaws.com   80:30140/TCP,443:30581/TCP   119s   app.kubernetes.io/component=controller,app.kubernetes.io/instance=nginx-ingress,app.kubernetes.io/name=ingress-nginx
Setting Domain and TLS certificate
The best way to make public ingress resources is with Dynamic DNS and TLS certificate, for this task we need to buy a Domain on Route53 (I bought a .click domain for 3usd) or to delegate the zone on Route53.
Note: I’ll use example.com for this tutorial, you can use whatever you want.
To secure the traffic using TLS we need the wildcard certificate setting on AWS Certificate manager, *.example.com and validate with DNS or Email.
In summary, as a prereq we need:
- Buy the Domain or Delegate the zone on Route53
- Request a certificate on AWS Certificate Manager
- Create records in route53 to validate the Certificate
When we have all that, we can check them.
Check the zone:
> aws route53 list-hosted-zones
{
    "HostedZones": [
        {
            "Id": "/hostedzone/Z02855792S1GV7JKSSYHM5",
            "Name": "example.com",
            "CallerReference": "RISWorkflow-RD:b5fbcas3e-7281-4f57-814c-de34ecfd2adf",
            "Config": {
                "Comment": "HostedZone created by Route53 Registrar",
                "PrivateZone": false
            },
            "ResourceRecordSetCount": 2
        }
    ]
}
Check the certificate:
> aws acm list-certificates --region us-east-1
{
    "CertificateSummaryList": [
        {
            "CertificateArn": "arn:aws:acm:us-east-1:452699334572:certificate/a3c23935-003f-40e1-8c6e-d0a20dcebe2a",
            "DomainName": "example.com"
        }
    ]
}
Configuring the External DNS
In short, external DNS is a pod running in your EKS cluster which watches over all your ingresses. When it detects an ingress with a host specified, it automatically picks up the hostname as well as the endpoint and creates a record for that resource in Route53. If the host is changed or deleted, external DNS will reflect the change immediately in Route53.
The next steps are two:
- Configuring the permissions to give access to Route53
- Deploying the External DNS
Configuring the permissions to give access to Route53
- Create/Associate IAM OIDC provider with the cluster
> eksctl utils associate-iam-oidc-provider --region=us-east-1 --cluster=test-sandbox --approve
2022-01-10 10:58:48 [ℹ]  eksctl version 0.76.0
2022-01-10 10:58:48 [ℹ]  using region us-east-1
2022-01-10 10:58:48 [ℹ]  will create IAM Open ID Connect provider for cluster "test-sandbox" in "us-east-1"
2022-01-10 10:58:50 [✔]  created IAM Open ID Connect provider for cluster "test-sandbox" in "us-east-1"
- Create an IAM role for the service account
An IAM role is a group of policy that grant specified permissions to a group of AWS services. Before we create the role, we must define a trust policy for it. The trust policy specifies which IAM entities (accounts, users, roles, services) can assume the role. Copy the provider and the ARN from the IAM Open ID connect provider created before.
trust-policy.json
{
  "Version": "2012-10-17",
  "Statement": [
    {
      "Effect": "Allow",
      "Principal": {
        "Federated": "arn:aws:iam::123456789:oidc-provider/oidc.eks.us-east-1.amazonaws.com/id/CF5E4B62055F3F7F476B2BB5C93C45E2"
      },
      "Action": "sts:AssumeRoleWithWebIdentity",
      "Condition": {
        "StringEquals": {
          "oidc.eks.us-east-1.amazonaws.com/id/CF5E4B62055F3F7F476B2BB5C93C45E2:aud": "sts.amazonaws.com"
        }
      }
    }
  ]
}
Creating the Iam role with the trust-policy.json file
> aws iam create-role --role-name eks-to-route53 --assume-role-policy-document file://trust-policy.json
Note: Copy the IAM Role ARN from the output we will need it.
Now we need to attach two policies, one inline policy and one managed policy called AmazonEKSClusterPolicy
To attach our custom inline policy first we need to write on a file for example eks-to-route53.json
{
  "Version": "2012-10-17",
  "Statement": [
    {
      "Effect": "Allow",
      "Action": [
        "route53:ChangeResourceRecordSets"
      ],
      "Resource": [
        "arn:aws:route53:::hostedzone/*"
      ]
    },
    {
      "Effect": "Allow",
      "Action": [
        "route53:ListHostedZones",
        "route53:ListResourceRecordSets"
      ],
      "Resource": [
        "*"
      ]
    }
  ]
}
The next step is to attach the policy to our eks-to-route53 IAM role
> aws iam put-role-policy --role-name eks-to-route53 --policy-name eks-to-route53 --policy-document file://eks-to-route53.json
Check if the policy is attached to the role
> iam list-role-policies --role-name eks-to-route53
{
    "PolicyNames": [
        "eks-to-route53"
    ]
}
Note: Inline policies have an on-to-one relationship with the Principal (role, user or group). This means that if we delete the IAM role, the inline policy also gets deleted.
Attach Managed policy to Iam Role:
We need to attach the AmazonEKSClusterPolicy AWS Managed policy to our rol
> aws iam attach-role-policy --policy-arn arn:aws:iam::aws:policy/AmazonEKSClusterPolicy --role-name eks-to-route53
Verify if the Managed policy is attached to our Rol
> aws iam list-attached-role-policies --role-name eks-to-route53
{
    "AttachedPolicies": [
        {
            "PolicyName": "AmazonEKSClusterPolicy",
            "PolicyArn": "arn:aws:iam::aws:policy/AmazonEKSClusterPolicy"
        }
    ]
}
Deploying the External DNS
We need to create some Kubernetes Resources using a yaml file and we need to substitute some variables:
- IAM-SERVICE-ROLE-NAME: ARN from the els-to-route53 created
- DOMAIN: The domain we configured on Route53
- TXT-ID: Is the zone id
apiVersion: v1
kind: ServiceAccount
metadata:
  name: external-dns
  namespace: kube-system
  # If you're using Amazon EKS with IAM Roles for Service Accounts, specify the following annotation.
  # Otherwise, you may safely omit it.
  annotations:
    # Substitute your account ID and IAM service role name below.
    eks.amazonaws.com/role-arn: arn:aws:iam::ACCOUNT-ID:role/IAM-SERVICE-ROLE-NAME
---
apiVersion: rbac.authorization.k8s.io/v1
kind: ClusterRole
metadata:
  name: external-dns
rules:
- apiGroups: [""]
  resources: ["services","endpoints","pods"]
  verbs: ["get","watch","list"]
- apiGroups: ["extensions","networking.k8s.io"]
  resources: ["ingresses"]
  verbs: ["get","watch","list"]
- apiGroups: [""]
  resources: ["nodes"]
  verbs: ["list","watch"]
---
apiVersion: rbac.authorization.k8s.io/v1
kind: ClusterRoleBinding
metadata:
  name: external-dns-viewer
roleRef:
  apiGroup: rbac.authorization.k8s.io
  kind: ClusterRole
  name: external-dns
subjects:
- kind: ServiceAccount
  name: external-dns
  namespace: kube-system
---
apiVersion: apps/v1
kind: Deployment
metadata:
  name: external-dns
  namespace: kube-system
spec:
  strategy:
    type: Recreate
  selector:
    matchLabels:
      app: external-dns
  template:
    metadata:
      labels:
        app: external-dns
    spec:
      serviceAccountName: external-dns
      containers:
      - name: external-dns
        image: k8s.gcr.io/external-dns/external-dns:v0.7.6
        args:
        - --source=service
        - --source=ingress
        - --domain-filter=YOUR-DOMAIN # will make ExternalDNS see only the hosted zones matching provided domain, omit to process all available hosted zones
        - --provider=aws
        - --policy=upsert-only # would prevent ExternalDNS from deleting any records, omit to enable full synchronization
        - --aws-zone-type=public # only look at public hosted zones (valid values are public, private or no value for both)
        - --registry=txt
        - --txt-owner-id=YOUR-TXT-ID
      securityContext:
        fsGroup: 65534 # For ExternalDNS to be able to read Kubernetes and AWS token files
Creating the resources:
> k apply -f external-dns.yaml
serviceaccount/external-dns created
clusterrole.rbac.authorization.k8s.io/external-dns created
clusterrolebinding.rbac.authorization.k8s.io/external-dns-viewer created
deployment.apps/external-dns created
Testing DNS creation on Route53
We can test the DNS creation using a Service of type Loadbalancer, first we need to create a deployment
> k create deploy nginx-test --image nginx
Creating the service with the annotation to create the DNS using the nginx-test-service.yaml
apiVersion: v1
kind: Service
metadata:
  labels:
    app: nginx-test
  name: nginx-test
  annotations:
    external-dns.alpha.kubernetes.io/hostname: testing-nginx.example.com
spec:
  ports:
  - port: 80
    protocol: TCP
    targetPort: 80
  selector:
    app: nginx-test
  type: LoadBalancer
Creating the Service
> k apply -f nginx-test-service.yaml
service/nginx-test created
Testing the application
> curl testing-nginx.example.com
<!DOCTYPE html>
<html>
<head>
<title>Welcome to nginx!</title>
<style>
html { color-scheme: light dark; }
body { width: 35em; margin: 0 auto;
font-family: Tahoma, Verdana, Arial, sans-serif; }
</style>
</head>
<body>
<h1>Welcome to nginx!</h1>
<p>If you see this page, the nginx web server is successfully installed and
working. Further configuration is required.</p>

<p>For online documentation and support please refer to
<a href="http://nginx.org/">nginx.org</a>.<br/>
Commercial support is available at
<a href="http://nginx.com/">nginx.com</a>.</p>

<p><em>Thank you for using nginx.</em></p>
</body>
</html>
Debugging External DNS and Route53
If we have some problem with the DNS records after 300 seconds or 5 minutes we could check the External DNS pod Logs.
> k logs external-dns-pod -n kube-system -f
time="2022-01-19T04:16:07Z" level=info msg="All records are already up to date"
time="2022-01-19T04:17:09Z" level=info msg="Desired change: CREATE testing-nginx.example.com A [Id: /hostedzone/Z02855792S1GV7JKSYHM5]"
time="2022-01-19T04:17:09Z" level=info msg="Desired change: CREATE testing-nginx.example.com TXT [Id: /hostedzone/Z02855792S1GV7JKSYHM5]"
time="2022-01-19T04:17:09Z" level=info msg="2 record(s) in zone example.com. [Id: /hostedzone/Z02855792S1GV7JKSYHM5] were successfully updated"
time="2022-01-19T04:18:08Z" level=info msg="All records are already up to date"
Testing Ingress resource and External DNS
I created a new service of type ClusterIP
> k get svc nginx-test
NAME         TYPE        CLUSTER-IP       EXTERNAL-IP   PORT(S)   AGE
nginx-test   ClusterIP   10.100.153.215   <none>        80/TCP    59s
Now we need to create the ingress resource poiting to the service
apiVersion: networking.k8s.io/v1
kind: Ingress
metadata:
  name: ingress-test
  annotations:
    nginx.ingress.kubernetes.io/rewrite-target: /
    kubernetes.io/ingress.class: nginx
spec:
  rules:
  - host: nginx.example.com
    http:
      paths:
      - path: /
        pathType: Prefix
        backend:
          service:
            name: nginx-test
            port:
              number: 80
Apply the file
> k apply -f ingress-test.yaml
ingress.networking.k8s.io/nginx-test created
Verify the Ingress resource, and curl to the new endpoint nginx.example.com
> k get ingress
NAME           CLASS    HOSTS                      ADDRESS                                                                PORTS   AGE
ingress-test   <none>   nginx.example.com  123.us-east-1.elb.amazonaws.com   80      4m36s
> curl nginx.example.com
<!DOCTYPE html>
<html>
<head>
<title>Welcome to nginx!</title>
<style>
html { color-scheme: light dark; }
body { width: 35em; margin: 0 auto;
font-family: Tahoma, Verdana, Arial, sans-serif; }
</style>
</head>
<body>
<h1>Welcome to nginx!</h1>
<p>If you see this page, the nginx web server is successfully installed and
working. Further configuration is required.</p>

<p>For online documentation and support please refer to
<a href="http://nginx.org/">nginx.org</a>.<br/>
Commercial support is available at
<a href="http://nginx.com/">nginx.com</a>.</p>

<p><em>Thank you for using nginx.</em></p>
</body>
</html>
Conclusion
Now everytime we need to create a new ingress resource to expose our applications we won’t need to create manually the DNS on Route53. This will be useful when we have a CICD process.
References
- https://aws.amazon.com/blogs/opensource/network-load-balancer-nginx-ingress-controller-eks/
- https://aws.amazon.com/premiumsupport/knowledge-center/eks-access-kubernetes-services/
- https://joachim8675309.medium.com/adding-ingress-with-amazon-eks-6c4379803b2
- https://peiruwang.medium.com/eks-exposing-service-with-external-dns-3be8facc73b9
- https://kubernetes.github.io/ingress-nginx/
- https://www.nginx.com/products/nginx-ingress-controller/
- https://www.padok.fr/en/blog/external-dns-route53-eks
- https://github.com/kubernetes-sigs/external-dns
- https://www.stacksimplify.com/aws-eks/aws-alb-ingress/install-externaldns-on-aws-eks/