EX180 Red Hat Certified Specialist in Containers and Kubernetes Exam Tips
EX180 is a 2 hours hands-on exam about Containers, Kubernetes, and Openshift. It is based on Podman instead of Docker, and this is a significant improvement in security and a bit more isolated because it is Rootless and Daemonless. Also, the exam tests your skills in some specified Openshift topics such Source-2-Image, Templates, Routes, and so on.
The EX180 certification is a 2 hours hands-on exam and tests your skills on Containers, Kubernetes and Openshift.
The exam is based on Openshift 4, and Redhat 8. Also we need to use Podman instead of Docker.
If you use Docker and Kubernetes in your daily, is not a hard exam, you will need to learn some particular aspect of Podman and Openshift such S2Image, Templates, Routes and so on.
As usual, the Red Hat certifications are fun to prepare and you learn a lot studying and doing the labs.
Table of contents
Preparation
To prepare the certification i read the Red Hat Oficial Documentation:
Also i watched the Sander Van Vugt Video Course. The Sanders Video course is pretty new, and he is fantastic at explaining the different topics, i also passed the RHCSA thanks to their courses. You can give it a try and activate the FREE trial for 10 days.
Objectives
You should be able to demonstrate these skills and abilities:
- Implement images using Podman
- Understand and use FROM (the concept of a base image) instruction.
- Understand and use RUN instruction.
- Understand and use ADD instruction.
- Understand and use COPY instruction.
- Understand the difference between ADD and COPY instructions.
- Understand and use WORKDIR and USER instructions.
- Understand security-related topics.
- Understand the differences and applicability of CMD vs. ENTRYPOINT instructions.
- Understand ENTRYPOINT instruction with param.
- Understand when and how to expose ports from a Docker file.
- Understand and use environment variables inside images.
- Understand ENV instruction.
- Understand container volume.
- Mount a host directory as a data volume.
- Understand security and permissions requirements related to this approach.
- Understand lifecycle and cleanup requirements of this approach.
- Manage images
- Understand private registry security.
- Interact with many different registries.
- Understand and use image tags.
- Push and pull images from and to registries.
- Back up an image with its layers and meta data vs. backup a container state.
- Run containers locally using Podman
- Get container logs.
- Listen to container events on the container host.
- Use Podman inspect.
- Basic OpenShift knowledge
- Creating applications in OpenShift
- Create, manage and delete projects from a template, from source code, and from an image.
- Customize catalog template parameters.
- Specifying environment parameters.
- Expose public applications.
- Troubleshoot applications in OpenShift
- Understand the description of application resources.
- Get application logs.
- Inspect running applications.
- Connecting to containers running in a pod.
- Copy resources to/from containers running in a pod.
As with all Red Hat performance-based exams, configurations must persist after reboot without intervention.
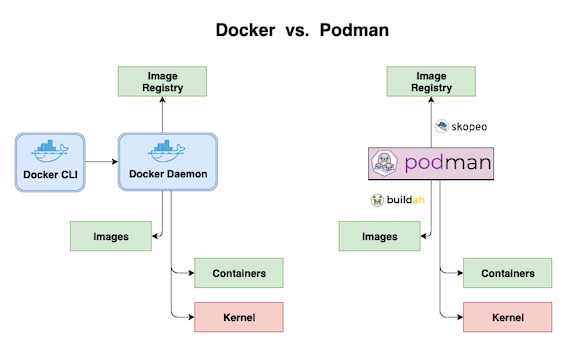
Main advantages of Podman
Podman is very similar to Docker and we can do almost the identical all commands, however podman runs on a daemonless architecture and also is rootless, for that reason the user does not need any root privileges, this is a big improvement because Podman can only see and modify their own containers. In brief Podman is more secure and a bit more isolated to use than Docker.
- Running in rootless mode - rootless containers are much more secure, as they run without any added privileges
- No daemon required - these tools have much lower resource requirements at idle, since when you are not running containers, Podman is not running versus having a daemon always running
- Native systemd integration - Podman allows you to create systemd unit files and run containers as system services
Podman command-line tools
Red Hat provides a set of command-line tools that can operate without a container engine. These include:
-
podman - for directly managing pods and container images (
run,stop,start,ps,attach,exec, and so on) -
buildah - for building, pushing, and signing container images
-
skopeo - for copying, inspecting, deleting, and signing images
-
runc - for providing container run and build features to podman and buildah
-
crun - an optional runtime that can be configured and gives greater flexibility, control, and security for rootless containers
Tools like podman, buildah, and skopeo enable you to create and manage rootless containers, which are containers that don’t require root access to be built and deployed.
Installing and configuring Podman
I’ml using a RHEL system on AWS for the installation because is the most similar environment to the Red Hat Exam.
$ yum module install -y container-tools
Optional: Install the podman-docker package
$ yum install -y podman-docker
The podman-docker package replaces the Docker command-line interface and docker-api with the matching Podman commands instead.
Now we can test podman
$ podman run --name=myubi registry.access.redhat.com/ubi8/ubi cat /etc/os-release
REDHAT_BUGZILLA_PRODUCT="Red Hat Enterprise Linux 8"
REDHAT_BUGZILLA_PRODUCT_VERSION=8.4
REDHAT_SUPPORT_PRODUCT="Red Hat Enterprise Linux"
REDHAT_SUPPORT_PRODUCT_VERSION="8.4"
Important: The good news is that if you know basic Docker commands, you can usually simply replace docker with podman and do whatever you’re used to doing. As a matter of fact, the two command-line interfaces are so similar that some users define alias docker='podman'
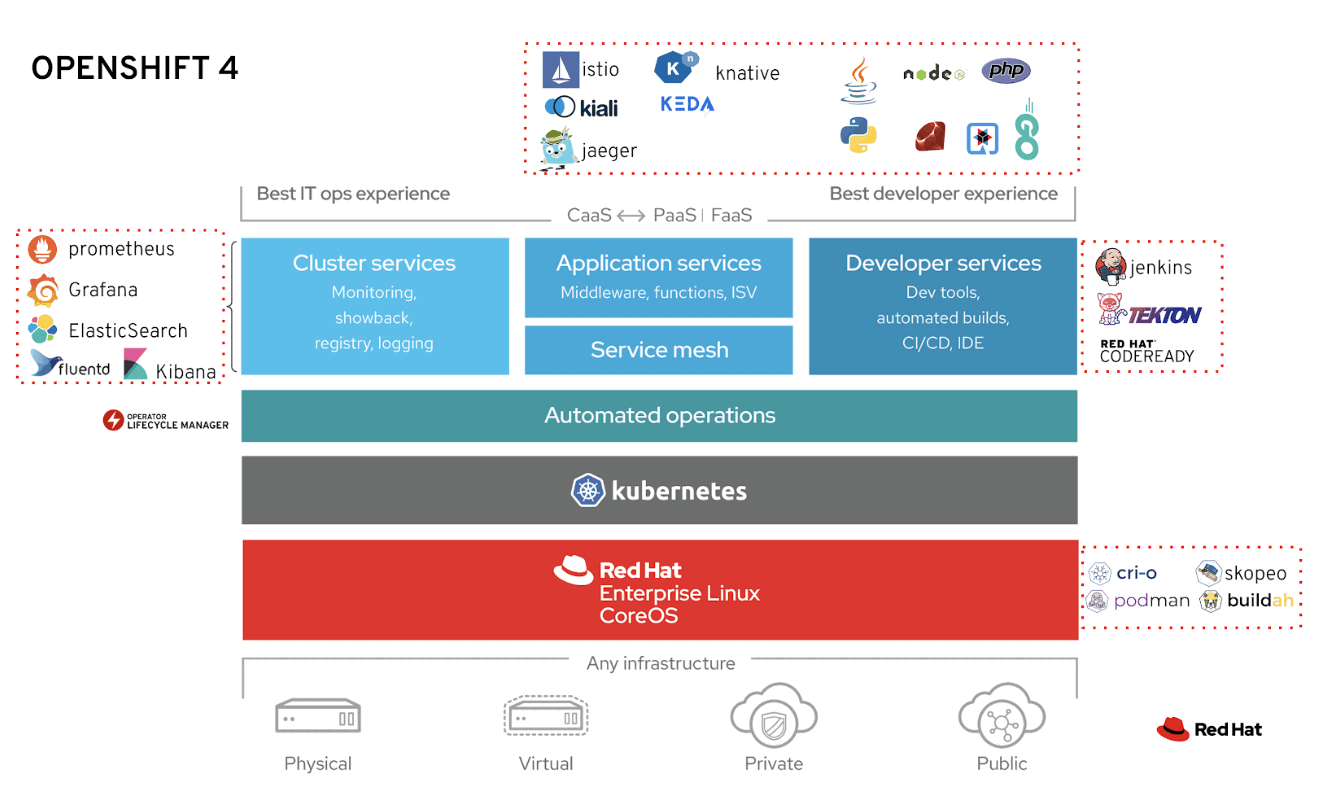
Openshift Overview
Red Hat Openshift Container Platform (RHOCP) is a set of modular components and services built on top of Kubernetes. RHOCP add capabilites such as remote management, multitenancy, more security, monitoring and auditing, application life-cycle management, and self-service interfaces for developers.
The main features are:
- Integrated developer workflow: CI/CD pipelines and S2I (A tool to build artifacts from source repositories to container images).
- Routes: Easily expose services to the world.
- Metrics and logging: Include buil-in and self-analyzing metrics service and aggregated logging.
- Unified UI: Openshift brings unified tools and a UI to manage all the different capabilites.
Note: OpenShift 4 is 100% open source and comprises several key CNCF open source projects.
Openshift Sandbox
Openshift Sandbox is a free cloud service to try Openshift for 30 days. We only need a Red Hat Account and we may test openshift in less than 5 minutes.
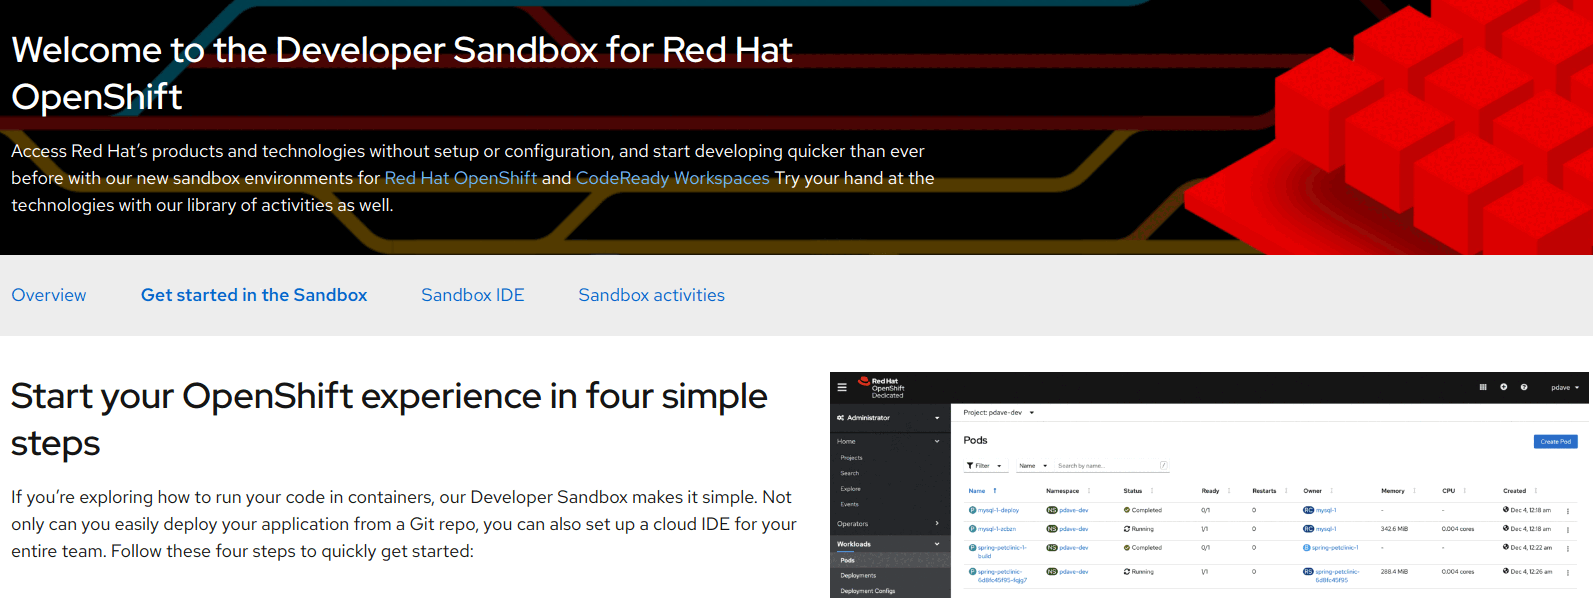
After validated the account they give access to the GUI interface with “Openshift_SRE” (Admin) or “DevSandbox” (User). We can select DevSandbox and enter to the Graphical Console
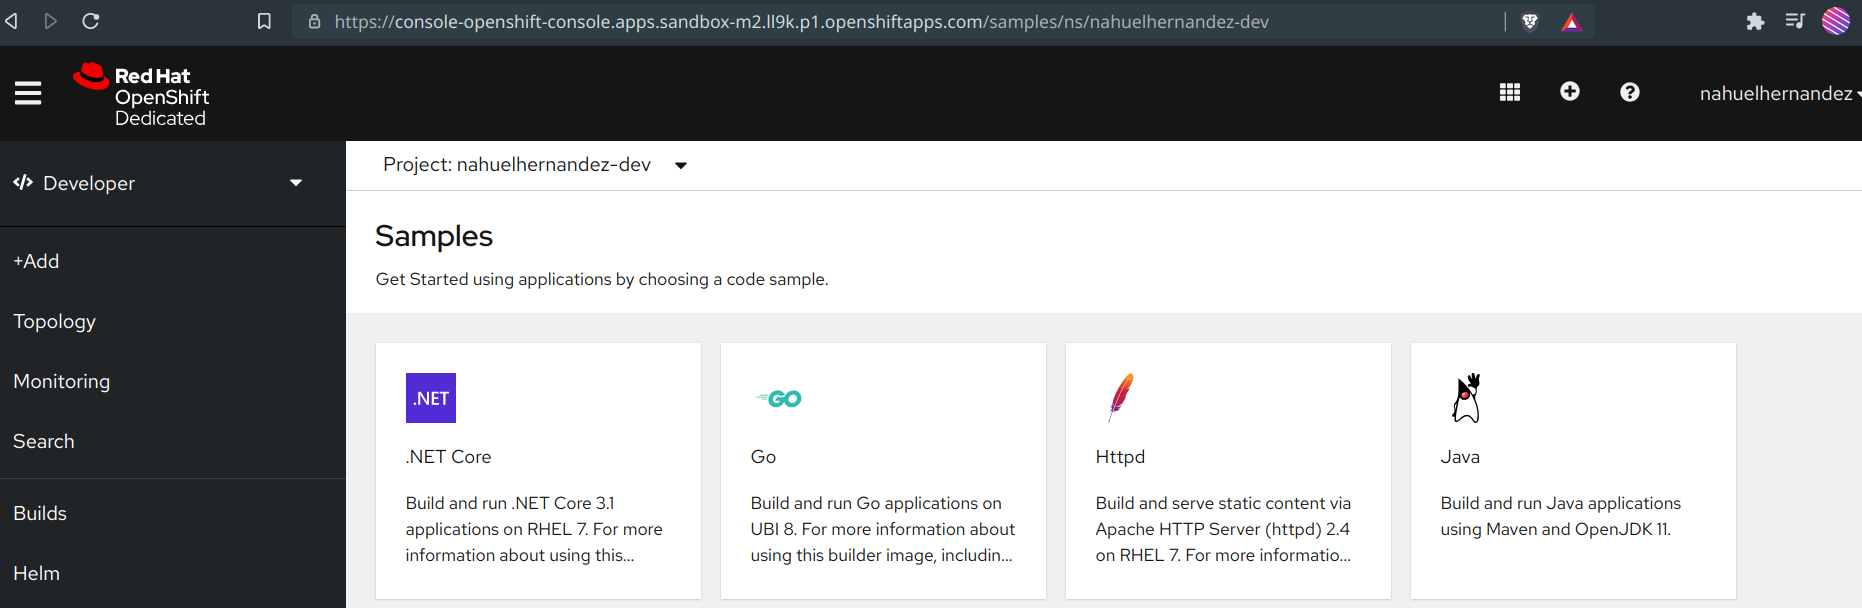
Also it’s possible to connect to the Openshift Console (CLI) in the Sandbox.
First, we need to download the oc binary and configure it in the system.
$ mkdir oc-client && cd oc-client
$ wget https://mirror.openshift.com/pub/openshift-v4/clients/ocp/stable/openshift-client-linux.tar.gz
$ tar zxvf openshift-client-linux.tar.gz
$ sudo mv oc /usr/sbin/
Now we need to go back to the web console, click on our username (in the upper-right corner) and select “Copy login command”
This gives us an API token and login command
$ oc login --token=sha256~Gtaz02... --server=https://api.sandbox-m3.ll9k.p1.openshiftapps.com:6443
Logged into "https://api.sandbox-m2.ll9k.p1.openshiftapps.com:6443" as "nahuelhernandez" using the token provided.

You have access to the following projects and can switch between them with 'oc project <projectname>':

  * nahuelhernandez-dev
    nahuelhernandez-stage
Now we can use the command line in the Openshift Sandbox. This is the preferred way to practice for the exam, because it is faster and we have more options.
However, my recomendation is to install CRC and run Openshift locally, because we don’t have the 30 day limits and also we have a full admin access.
Openshift Lab with CRC
For practice to the exam we need to create labs to use Podman and to use Openshift. Make a Podman lab is pretty easy to create in every Linux distribution, on the other hand, for create a Openshift Lab is more complicate, for that reason we will use Code Ready containers, CRC is as all-in-one solution for creating an Openshift 4 environment and allow us to create a minimal cluster on our desktop/laptop for local development and testing.
CRC Key Points
- CRC use native virtualization for that reason we don’t need extra virtualization tools such as VirtualBox, KVM.
- CRC uses a single node for master and worker node.
- Some Operators as machine-config and monitoring Operators are disabled by default.
Labs requirements
- Linux Rhel/CentOS/Fedora/Debian/Ubuntu or Windows Professional
- 4 virtual CPUs
- 12 gb of memory
- 35 gb of storage
Installing CodeReady Containers
I’m using a Debian OS with 16gb of ram, and with need KVM and Virtualization enabled on our computer.
First we need to download the latest release, extract it and move the binary to /usr/local/bin
$ wget https://developers.redhat.com/content-gateway/rest/mirror/pub/openshift-v4/clients/crc/latest/crc-linux-amd64.tar.xz
$ tar xvf crc-linux-amd64.tar.xz
$ sudo mv crc-linux-1.28.0-amd64/crc /usr/local/bin/
Now we can setup the environment
$ crc setup
Note: A Red Hat Account is requiered in order to access the user pull secret. The pull secret can be copied from the Pull Secret section from https://cloud.redhat.com/openshift/install/crc/installer-provisioned
After that we can finally Start CRC
$ crc start
The clusters takes more than five minutes to start the necessary containers.
Access the Openshift Web Console:
$ crc console
This will open your web browser and direct it to the web console. After that log in to the OpenShift web console as the developer user with the password printed in the output of the crc start command.
Access the Openshift cluster via oc command:
$ crc oc-env
$ oc login -u developer https://api.crc.testing:6443
Note: The password for the developer user was printed in the output of the crc start command. You can also view it by running the crc console --credentials command.
For the last, we can stop the running CodeReady Containers.
$ crc stop
References
- https://www.redhat.com/en/services/training/ex180-red-hat-certified-specialist-containers-kubernetes-exam
- https://docs.openshift.com/container-platform/4.6/welcome/index.html
- https://github.com/containers/podman
- https://access.redhat.com/documentation/en-us/red_hat_codeready_containers/1.0/html/getting_started_guide/getting-started-with-codeready-containers_gsg
- https://cloud.redhat.com/openshift/create/local
- https://cloud.redhat.com/openshift/install/crc/installer-provisioned
- https://learning.oreilly.com/videos/red-hat-certified/9780137442058
- https://access.redhat.com/documentation/en-us/red_hat_enterprise_linux/8/html-single/building_running_and_managing_containers/index
- https://developers.redhat.com/blog/2019/04/25/podman-basics-cheat-sheet
- https://developers.redhat.com/blog/2020/11/19/transitioning-from-docker-to-podman
- https://developers.redhat.com/blog/2019/04/25/podman-basics-cheat-sheet
- https://www.openshift.com/blog/whats-inside-openshift-4